Showing posts with label birds. Show all posts

Wednesday, April 13, 2011

Chilly Birthday

This is another birthday treat that made it onto Facebook, but never made it to the lime light here on the blog.......oops. This is an example of the Gum Paste. Can you tell any difference? Gum Paste vs Fondant doesn't really look much different when finished. However, the gum paste dries much quicker. Well fondant dries quickly too........let me explain better. When I am using fondant to make figures it tends to stay soft longer when I am doing the actual moulding. So it is hard to get a specific shape - most frustrating a ROUND shape. Because one side will want to start to rest and become the kinda flat side. Which isn't a big problem for something like a cake because you want it to have a somewhat flatter side so that it won't roll off the cake or require so much icing to make it stay in place that it shows a lot. Gum paste will set up (dry) a little faster. So the resting doesn't cause the figure to fall out of the shape I want. Does that make sense?
Also - gum paste is a little more forgiving then fondant when it comes to creating figures. If I mess up a figure with either modeling medium I have to wad it up and start over. Sugar dries - as we mentioned before - and it is useful sometimes to have powder (in the form of powdered sugar or corn starch) on the mat I am creating on so that the figures don't stick - if they do stick then I have to tug on them to pick them up and they easily stretch out of shape (imagine playdoh). After wading up a piece of fondant that has been touching a powder you are also adding in the powder that is attached - thus causing the fondant to dry out a bit more. You can counter this by adding a little smidge of shortening or butter (very little), but still you are altering the original texture.


Gum paste doesn't seem to stick to the mat as much - so I can create more without using a powder substance to keep it from sticking. Thus when I mess a form up..........and let's just say that happens with every new thing I create....because the cake pops have now proven I am not perfect every time. With the gum paste I can wad it up - use it - wad it - use it. Not forever of course - but for a little longer then the fondant.

One additional pro for gumpaste over fondant for making figures - you can roll it out MUCH thinner!! Fondant will tend to tear if you roll it out too thin - or crack - or break after it has dried a bit and you try to move it. Gum paste has more elasticity to it. This stretchability (my word - yes you can copy it) helps when you are making roses, flowers, or other things that you mess with to give edges shape. Gum paste also costs a bit less to make - but oddly if you buy it at the store it costs more to buy. Weird huh?

Now in covering a cake - I would go fondant. It is softer in my opinion and easier to place over the cake. Tastes a bit more like icing. I know there are lots of folks who say.....ick fondant tastes awful. Well most likely the person who made your cake did it with store bought fondant. I am always amazed that people doing cakes don't just make their own fondant. Easy to make - and you can flavor it. I make 5lbs for half the cost you buy it at a store. Yes I know - convenience.......that is a whole other blog.


There are tons more Fondant vs Gumpaste issues in my head - but I can stumble into them later. Personally I was resistant to gumpaste - for no reason other then I was getting good at fondant and not wanting to add another trick to my bag. Now I am seeing that there are definite pro's and con's on both sides.


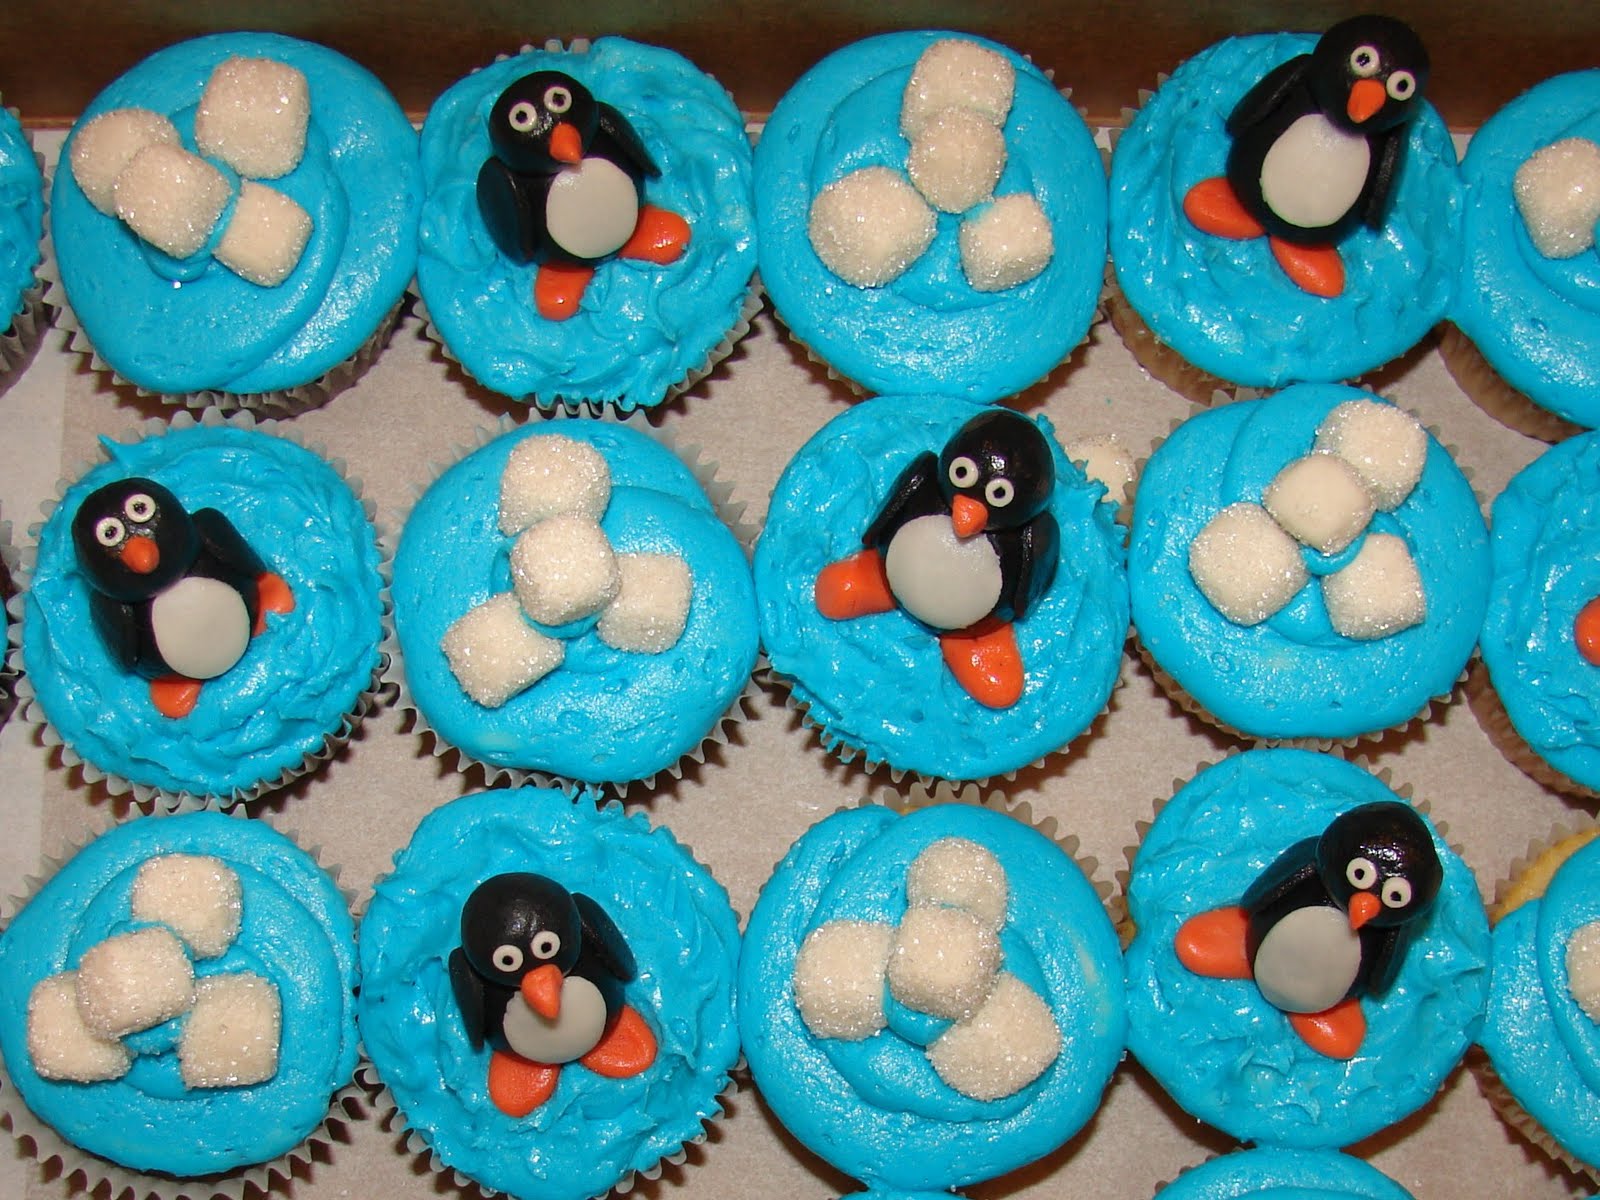
Penguin cupcakes were a hoot to make. And they were fun because it taught me I am getting better at moulding things. They went to one of our Boy Scout families. The Birthday Boy had recently done a project on penguins and he is currently in love with them. Fun!! Learning and Cakes combined with Birthday - LOVE IT!


These were Chocolate & White cake cupcakes with a Vanilla Buttercream icing.

Saturday, November 27, 2010

Hoo Hoo..........Owl Cake

Do owls really say Hoot? Because sometimes it sounds more like Who..........to me. And more recently it sounded like a piercing scream that would be more like a woman being murdered in the woods...........but I understand that was the sound of a Screech Owl - perhaps a Normal Owl does say simply "Hoot".........when he wants a Tootsie Roll Sucker I guess.

This particular owl was a copy off of something I saw on the Internet again. It was a flicker post otherwise I would link to the website/blog it came from. Usually when you find something this cute you also find other cookies really cute too.

So this cake was also for the Craft Show Bakery - and it went home with a nice family too. A good friend of mine who said it was yummy.

The cake was Carrot Cake with a Cream Cheese icing and a Vanilla Fondant.........the owl being brown makes you think Chocolate though doesn't it?

Thursday, November 25, 2010

2 Turkeys.......Happy Thanksgiving!!

The other day I was searching "Turkey Cakes"........the above is similar to what I was looking for - a cartoony looking turkey. Really what I ended up doing was finding a cartoon picture of a turkey and kinda going off of that.

This turkey is cute........Chocolate Chocolate Chip cake (again) and topped with a Chocolate Ganache..........yummy I understand...........

However, this is NOT what peaked my interest. See I have been wondering if I can make something REALISTIC - I do the replica stuff and it is fun and less nerve-racking then I would expect, but there is this voice that says "can you do the stuff you see on TV?"........and then I saw this totally cool picture of a roasted turkey with veggies..........hmmmm.....we were going to relatives for the meal and wouldn't that be fun to bring - because goodness knows I would never ever agree to do a cake for someone saying "sure I can do realistic" without having done it first!!

So to see how easy/hard it might be I decided to make some fondant veggies. There were a bunch of cake with fondant work this week.........so you can see peas for future baby shower pea pods, pumpkins, apples, leaves.....but those other things are carrots, potatoes, green beans and my kids TOTAL favorite - brussell sprouts (just kiddin' - my kids hate those).

After making them the next day I came back and painted them. If I had painted them when they were freshly made the paint/water would have made it all kinda mushy. So I thought I would wait a day.........how cool are they now? I chopped the carrots up - that was the plan all along - I kept them to dry in their "big" shape so they would stay the right size.

Next was to start the turkey itself. First I lined the bottom of a roasting pan with cake. It kinda crumbled, but I didn't care since it was the "bottom". I just wanted to get a little height off the bottom of the pan to give a wider base for the turkey.

Then I added a round bottomed cake. I used a glass mixing bowl to make this. It is a nice way to get a sweet rounded shape.

With a smaller glass mixing bowl I did another round - just smaller - so that I could have that shape too. These will be the drum sticks. I trimmed both the pieces.........sorry my hands were messy with cake and I couldn't take a picture......

Then I Dirty Iced the cake pieces. Leaving indents in the areas between the base of the turkey and the turkey legs. Doesn't look like a turkey yet? Well keep going......

While waiting for the icing to set so I could put more on top without getting crumbs in it - I made some stuffing. I diced leftover cake into pieces - set the oven to 225 - then popped the cut up pieces into the oven for 30 minutes to dry out.
Guess what this is????? Yep - STUFFING!! Can't have a real bird without the stuffing.
The next step was to give the bird some skin It is kinda creepy looking like this. I did the fondant in a skin tone - then dropped it on the bird shaped cake.
PERFECT edges thank you!!
Course this isn't really like it has a "edge", but there were NO significant cracks of any sort what so ever..............whooo hoooo...........I am getting better at this stuff.
Cool right?? So I took out my trusty paint brush and some coloring tints - painted the skin yellow first - then went over it with brown - that made a kinda gushy surface and I stippled the surface until the sugar started to re dry......if I had stopped before the sugar started to dry back up then the bird would have had a more glazy look and not so much a baked one.

Then after all that I cut a hunk out of the side of the cake. All that work right? Dropped some stuffing into the hole - filled in the empty spaces around the turkey with more stuffing and then put the veggies in.

AWESOME!! I am so excited about taking this to the Family Feast!! And I can guarantee that not a single one of my kids is going to complain when I say "eat a green bean please".
Happy Thanksgiving!!

Tuesday, October 12, 2010

Birds of a Feather - Part III - Celebrating Adoption

After making the nest and the birds - waiting a few days so everything would be nice and fresh......it was time to bake the layers of the cake. I didn't take too many pictures of that. The bottom layer was my favorite - Carrot Cake - the middle was a from scratch Strawberry Cake (I get to learn new things from others choices) - and the top layer was a Coconut Cake (another newbie to me). All done in two cakes to give a little extra height. And yes.........I warned them they would have enough cake to feed all of the community.

Iced........the Carrot got Cream Cheese (of course) - the Strawberry received a Buttercream coating (which I whipped and it made the icing all crunchy.....won't be doing that for decorating under fondant again - makes the fondant bumpy) - the Coconut received a Cream Cheese with some Vanilla & Almond flavoring in them........yummy.

Then came the fondant. Practice Makes Perfect.......Practice Makes Perfect..........Practice Makes Perfect.......Rolling fondant out is super easy (in a building your bodies upper strength kinda way).......but not having the right tools makes the event super challenging because even if you get it all right on the counter - you still have to pick it up and put it on the cake.

The other day I hit this blog site about cakes - a supposed novice like myself doing cakes for fun and documenting them. Her cakes looked FABULOUS and were titled "My first fondant cake" - PERFECT - "My second fondant cake" - MORE PERFECT - "My third fondant cake" - FREAKING AMAZING......in my head - "well if she can do that me too!!"
While it certainly looks like I have that all under control.......this is where photography can create an illusion and where I began to wonder if the person on the Internet claiming to be so fabulous the first go round was telling the truth - because looks can be deceiving......

Flip my cake around and this is what you see..............AHHHH!!!! Sure it rolled out great - in theory all you have to do is roll it onto the rolling pin and you will be golden.........Sure......"My first fondant cake" (not really mine....just channeling the cake site hit).
This is where having children is helpful for me. After crying out loud - like seriously finally breaking down and crying (for about 15 seconds) and having my children stand in shock watching.........I picked myself up - looked them in the eye and said, "There is always a way to make things better." and then something along the lines of, "Never be a quitter."

Then I started to get creative. The other day I also watched a video on YouTube about making fondant bows. While I had never tried to do this before I figured.......it can't get worse right? Did the bow fix the problem? No not really -but it was a good start and I did still have all that beautifully colored fondant left to find a way to decorate the cake with.
Color on a blank pallate can change everything..........and distract the eye. So the night prior to the final fondant I had spent some time making different types of flower and things to place on the cake. Remember the only real design element that was asked for was color - nothing about how to get it into the design - just that it existed in the final product. These colors all matched the Bird Family.

As I began putting the flowers and leaves onto the cake and around the areas of the un-sightly fondant - I began to notice that I no longer really noticed the gaping fondant mistakes that were part of the cake.
I also began to realize why so many fondant cakes have either a real ribbon around the base of the cake - or they have a fondant strip in a color that is made to LOOK like a ribbon at the base of each tier. Things are becoming clearer to me. Those perfect cakes may be more of an illusion - and it may be why so many of the photos are not taken as "up close" as my photos are. Smart bakers.

Still all the added color and the bows did take care of the truly tear inducing look of my fondant covering. At this point in the decorating I was feeling like announcing - with happiness - "My first fondant cake - I am AWESOME!"

and there was one side of the cake that DID look close to perfect - it was the BACK SIDE - where I was able to leave just a few flowers so that all the eyes were pulled forward into the camouflaged area.
Personally I quite like the back.

The nest and the cake.......notice the nest is darker now? Yes, as I said earlier - once the cake was covered I noticed that the white fondant and the light tannish color of the original birds nest really kinda washed out compared to the colorful flowers and the colorful bird family. So a quick fix was in order for the families nest. Darker worked much better.


The Final Cake. I was so happy to have this done and looking really really cute. Yea Me!!
Even more so - Yea the Family that has built a Nest so loving that they could add 5 children to is in less then 1 year. Our family is very proud to have them as our friends and we were so happy to be part of their special day.


Monday, October 11, 2010

Birds of a Feather - Part II

Step II for Birds of a Feather was to make the Birds. Now just like every other kids I LOVED modeling things in school with playdoh and that clay stuff that would dry and then you would take the item home to give to your parent as a very "special gift". So this seemed like a no brainer - loved it as a kid - must love it as an adult - right?

Problem.......I forgot that as a kid when I molded things for my parents their acceptance usually started kinda like this........"oh how lovely Patti - it's ahhh.....well it is ahhhh...."

Not surprisingly that is somewhat how my first attempts at making birds with fondant went. Kinda wonky. However, to start out with I was being very careful about how much fondant to color. Didn't want to waste it because I was going to need it for lots of additional stuff - yet didn't want to make too little and have teenie tiny little birds. So I did what you see above - I pre-badly-modeled some birds just to get a feel for how much fondant to color.


Once I had the colors set I was happy. Course the three days later I realized that I needed to make yet MORE fondant for the rest of the cake that was in the same exact colors as the birds. Duh it would have been smarter to color all the fondant at the same time............Live and learn right?

After a few attempts I started to get the hang of making the birds. I saw some online that I thought were really cute and I fashioned mine off those........certainly the original ones I was working from were done by a fondant sculpting master, but given this was my second time really making shapes - I am pretty darn happy with the outcome.

Here is most of the Flock after I finished them and washed the fondant off with a bath of vodka and some tiny sparkly flecks.
And thus Part II of the cake was finished. So now just to wait a few days for the birds to set so that I didn't mess them up.


Sunday, October 10, 2010

Birds of a Feather - Part I


A few weeks ago I was offered the chance to make a SUPER COOL cake!! Some friends of our grew their family from 1 daughter who was 3 years old - to - 5 daughters who are all under the age of 4 (two 4 year olds - one 2 year old - two 1 year olds) all in less then a year.....but it has been about 2 years that they have all been together. The occassion they were celebrating? The finalization of the adoption for two of their daughters. Two are bio theirs and the final daughter is the sibling to the two becoming legally theirs. So it really was a wonderfully special occassion!!

The mom of this brood asked me if I ever do cakes for others.......do I ever do cakes for others?? Only when they ask!! And so it was that our family got to gift their family a tremendously important cake.

What to do - how to do it - what could be special enough to convey the day? The family asked for VERY BRIGHT girlie colors. After that I was told "do whatever you want" - but there was a hint that a tiered cake would be fun.

So my first picture is the stacking.....how big and how much........


The bowl on the top was for me to figure out how big to make my "special element". Since I was given full creative license I thought it would be fun to make a birds nest and have the ENTIRE family represented in a nest together at the top of the cake. So I needed to make a nest.

Making the nest I began by lining a bowl (as seen on top of the stack) with plastic.

Next I took some white melting chocolates and well.......melted them.........this time in the microwaved.


After they were melted I stirred them up until they were smooth. Then I took another step not shown and added a small bit of brown dye in the chocolate to make it more resemble the color of a birds nest.


Put all the chocolate into an icing bag with a medium sized tip and began to put the chocolate into the bowl - going back and forth making a random pattern - to of course look similar to a nest.


Once this was done I let it sit and harden. Tah Dah...........I don't have a final picture of the nest until later in the cake. The nest on the cake though is a darker brown - in the end I felt like this mild brown color was not holding its own against the bold colors of the birds and we ate this one.

Still - it was fun working to figure this out. And even more fun to see how excited the kids were about the final product.