Showing posts with label kids cake. Show all posts

Monday, July 11, 2011

Sponge Bob Revisited

Remember the tractor cake? If so then you probably remember the picture you see here. Tractor wheels was the point to this picture.........but at the end of the tractor wheels there was left over RKT (rice krispy treats). My kids eat a lot of sweet treats if I leave them laying about. To try to keep that from happening I toss a lot of the scrap stuff into the trash. But I will be honest - that is SOOOOO hard to do sometimes because we are always taught not to be wasteful. On this particular day I also had a Sponge Bob cake to do - so I decided to use some of the extra RKT to fashion the arms and legs. Let them dry for a day with the tractor wheels and voila.....

This is technically my 3rd Sponge Bob cake. The very first was years and years ago for my almost 10 years old sons 3rd birthday. This cake is the 2nd Sponge Bob made with a fondant cover. I am just about ready to do Sponge Bob without looking at a picture anymore. ;o)

Still - no matter how many times you do the same thing - there is always something new and different you can bring into the mix. For this cake it was obviously the arms and legs made from RKT. I heard that the Birthday Boy LOVED the cake. We are on swim team with them and he came up to me the other day (this is months after the birthday) and said, "I am planning my birthday cake". Always fun to hear!!


This cake was Chocolate (if I am remembering right - geez o I should not wait so long to post things!) - Vanilla Buttercream icing and a Vanilla Fondant. Most of all it was loved and enjoyed!


Friday, June 24, 2011

Princess Castle Cake

Here is a cutie and a Quickie. I really wish that I took more time to take pictures of things as I put them together. Because the one thing that I am really giggly happy about this cake is the edging on each tier. Kinda like a railing to keep the princesses from falling over the edge........

Yet at the same time totally similar to a Crown.........yet completely edible. The person who asked me to do this cake sent a picture - and I was doing a sort of a copy job of that cake. As I looked closer at the cake I realized that the railing and the windows were plastic add ons. Disappointing, yet at the same time understandable - but copyable too. So I tried. I am pretty sure I got it. There was also a purple crown at the top (that I forgot to take an aerial pic of!) and a flag that went into the center and had the Birthday Girls name on it. Those things were given to the family to put on right before the party......so no pics for me, but safer for Michelle so she didn't have a crying princess.

Speaking of Princess - Michelle had a totally clever idea! In the original cake all the windows held princesses. Michelle sent a note saying, "What if we add my Princess into one of the windows?"..........Totally Clever!!! and.........Why Didn't I Think of That!!?? See her in the window above the door?? So cute!


I love it when the people asking me to do a cake have specific and clever ideas of things. Makes it more fun!


this cake was Chocolate in one tier and White in another tier. Vanilla Buttercream icing (we were trying not to cover the cake in fondant) and then Gumpaste for the railing crowns and Vanilla Fondant for the other additions.

Friday, May 20, 2011

Phineas

Okay here is another cake I have been sitting on for awhile. I posted the finished cake on my facebook blog link, but never did get it up here. This cake was fun. Michelle - the person who asked me to do it - found the base idea of the cake in a seach, but she wanted it tweaked a bit to include 2 themes - Phineas & Ferb at the beach & Dr. Doofensmirtz and Perry on another layer. But most of all we both wanted to see the "Logo" for the show on the cake........so I started by staring at it and thinking "how will I ever copy that to look authentic". After I did that for a few minutes I made fondant and began the process.

Being kinda caught up in what I was doing I forgot to take pictures (sound familiar). Honestly though my camera has more sugar on it then the cereal my kids are eating these days - so it might be better that I don't take pics during the process - for the life of my camera!

To create the logo I used an Egg Shaped cookie cutter and a tiny Oval shaped cookie cutter. Then matched the fondant up. I also printed the logo out 2 times. One was for referencing as I put things together and the other was to size that I wanted to make the logo for tracing the words Phineas & Ferb.
So basically - I cut 2 layers of the background orange. I placed the sucker pop sticks that I use for Cake Pops in the center of the 2 layers and adhered them to one another with Caro syrup. Then I placed the yellow layer and the small red dot in the middle on top and let it sit for a bit. (I am only NOW noticing that I forgot to pipe "and" in the red dot).

While that was drying a bit I rolled some gumpaste out really thin and let it set up (dry) a bit. This doesn't take long - maybe 5 or 10 minutes. Long enough to read a short book to a 5 year old who will hardly make it to the end of the book. Then I began cutting the letters out. Layed them over the top of the fondant and cut them out with a very sharp knife - or exacto knife. Once these were done I layed those on top of the logo to complete it. Phineas's hair didn't want to stay up and since it sits on the edge I decided that while it was drying for the next few days it would have a support - so I tucked some papertowel underneath it.

Then a few days later I began to assemble the cake. The top layer was Phineas and Ferb at the beach surfing. This is very close to a copy of the original cake Michelle brought to me.


The bottom layer though is different. In the version she and I decided I would create we did a lab for Dr. D and Agent Perry to be in. I asked my 9 year old what things a kid would expect to see in Dr. D's lab..........he said he had no clue. What??? He watched Phineas and Ferb for 2 hour stretches - kids. In fact he informed me that he really wasn't that "into" P&F anymore. Which I guess meant he was sleep watching all those episodes the day before. Kids.


Michelle and I agreed there would need to be a computer screen that said the birthday boys name.........

After that I figured there would need to be a Ray Gun and a few computers. It was fun looking at images of Dr. D's lab and then trying to bring them onto the cake with fondant.


One image I saw over and over was the lab - or some kind of a dome shape that looked like maybe it was a view from outside the lab? I wasn't sure, but I thought it looked fun to copy so I did. Later Ben came in when the cake was done and looked at it. His eyes lit up and he said it was totally cool. He walked around the cake and pointed out various things I had put in the lab and named them off - so I did copy the lab in a way that kids would recognize things - yea!!


And since this cake - Ben has found a renewed love for Phineas and Ferb. He has been watching it a lot lately. Sweet because I kinda like the catchy songs they sing.


This cake was chocolate on the bottom with a Oreo cookie buttercream center - and white on the top with a vanilla buttercream. All topped with a vanilla fondant. Yum!


Thursday, May 19, 2011

Confirmation Mosaic

So it is that time of hear........Confirmations, First Communions, Baptisms.........so many fun celebrations. A friend asked me if I would make a Confirmation cake for her son. Well originally in my head when she asked I thought it was for her daughter - and I proposed a nice white cake with a pink background and beautiful small roses........it was really pretty in my head.

And she totally agreed - but then she pointed out it was for Nate and not for her daughter so Blue themed might work a bit better. I poked around on the internet to see if anyone had come up with a brilliant idea for making a cake seem less girly for Confirmation. And I found a cake that wasn't for Confirmation - but it was a mosaic. This made me think of my friend Jeanette and all the beautiful mosaic's she does on her blog - Jeanette Eats Spaghetti and an idea was born. That is what I love about this cake art hobby - you literally can bring any other craft you do into a cake decoration.


I knew it would take me forever to do a mosaic all over the top of the cake - so I just did a small border of pieces around the main focal point of the cross. Which, by the way, I printed my own stencil out on paper ...........


So I did the most eye catching piece of mosaic on the side of the cake. Now......if you clicked over to Jeanette's blog and looked at the lovely tray that she mosaic'd (is that a word?) then you will see she used all her empty space. Me - not so much. But it was my FIRST time doing a mosaic. Now I would love love love to do something outside in our yard this summer. I am already looking about plates to break........


This cake was Chocolate with Vanilla buttercream icing and a touch of vanilla fondant.

Tuesday, April 19, 2011

Rapunzel & Architecture

It is the sweetest thing ever (pun intended on the use of sweet because....well this is about cakes) - Dave watches Alton Brown videos about cake stuff. I am not sure if he is doing this because I out loud say, "Why does that happen?" when some cake related thing occurs ........ or if it is because I try to explain something about a cake related thing and Dave doesn't get what I am saying and wants to hear an experts take........or if it is because really he has always like Alton Brown - which I shouldn't overlook - he has watched Alton on Food Network for years - but now he is looking up cake stuff and watching on the computer so I am totally taking it to be a sweet support to my cake dealings.

How is this related to the mess of stacked cake above? Well he was watching an Alton Brown episode about whipping eggs or something and there was a question/answer thing happening and he made the statement that many cake designers have an architecture background. Usually I can zone out what Dave is watching........because unlike the kids when they watch videos (like Annoying Orange) on the computer.....I don't make him put on earphones. This statement by Mr. Brown caught my attention - because in High School I studied drafting and architecture.......and then in my first year in college I continued my studies. Many of you know that following that first year I switched schools and eventually attended many colleges before earning my bachelors and masters in social work and counseling related fields - not architecture. Still.......I do have an architecture/design background of sorts. So this statement was kinda cool.

See Mr. Jackson........apparently I am using my years of architecture after all - just in cake building. Kudos to you for making me so good at it all.

Now the first picture is of a budding tower. And I didn't just stack those cakes up and hope for the best. That would have been ridiculously not smart.


This is the beginning of the roof top of the tower. The original cake I found on line had a roof just like this. But this looked pretty.........well..........boring and like a hat that I made in kindergarten with construction paper.
In fact if you turn it upside down you will see that it basically is the hat I made in Kindergarten. I took a piece of poster board - created a cone - lined that with plastic wrap so the fondant didn't adhere to the cone - then I put a base on the cone so that the weight of the fondant didn't pop it (I'm a mother - I worry about everything).


Then to make the cone head roof look a little nicer I put shingles on. This is my first shingle making and while I did really well, they are by far not at all uniform........of course if I think about it do you think the elves who were making the shingles in the forest for the magical tower that Rapunzel would live in made them all uniform? No probably not. Besides they were using wood - which is probably way easier then fondant. Elves have such an easy life. All they mostly make are cookies and shingles.


Now .......this is really the only architecturally structural picture I took. I knew that if I left the stacked cakes without a base support I would be crying the next day. So I put 3 very long dowel rods into the cake. Unfortunately one of the dowel rods went in at a slight angle. Personally I began freaking out as soon as I realized that to take it out and replace it might mean to cause holes that would cause cracks.


My husbands advice was that I was worrying about nothing that needed to be worried about. It would all be fine. Move forward and let it go.


My focus was to drive him berserk. "Can you come here and look at this?"......"What do you think does it look like it shifted?"......"Do you think it will hold?"......."How about now has it shifted now?"......each question came with his having to bend over and peer at the cake (or pretend to in order to appease me) as I turned the cake swirling around thing (you store may call it something else if you go to purchase one of these).


Once it seemed Dave had enough of this I left him alone.........for a bit at least.......and moved onto the next thing.


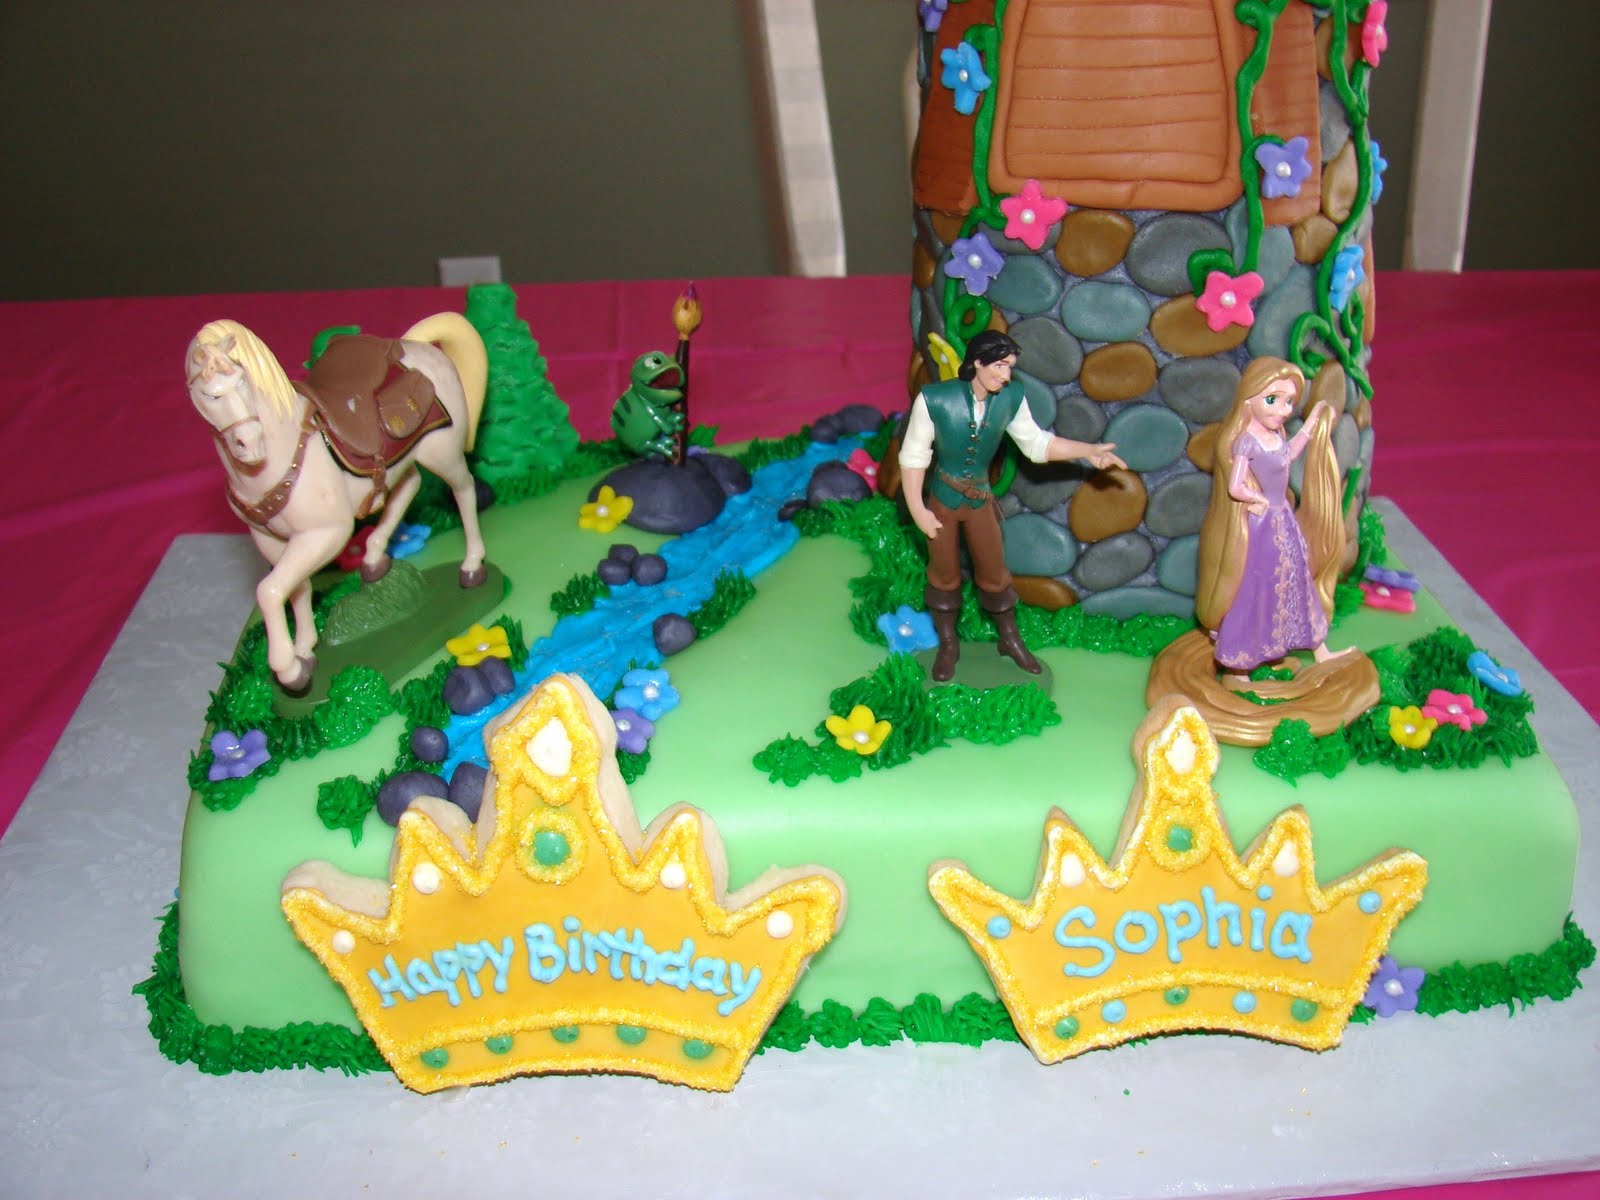
The landscape. I iced the landscape to include a river. Can you see the river?


As I was putting the landscape to the side to dry before putting fondant on it my 5 year old came in and said, "Maudy that is way too bumpy to be smooth." I said, "It is going to be a valley with a river in it. Can you see the river?"........he looked at me like I had lost my mind. Nodded his head and smiled at me like he was afraid to tell me he didn't think it did. And walked away.


I can see the river........can you see the river?


Then I iced the outside of the tower. A nice gray mortar kind of a color. And Dave and I did another round of "Can you come here and look at this?"......"What do you think does it look like it shifted?"......"Do you think it will hold?"......."How about now has it shifted now?"......


Then I began placing the rocks on the tower. Added a few windows that Rapunzel would have swung open if she were planning to throw her locks out to Finn to climb.......and did another round of Does this look leany to you Dave? Dave was getting quite tired of this game, but he was playing it really well by continuously stating, "No it is going to be fine." "It looks great.".......but he didn't want to play anymore and left - then luckily my friend, Sheri, showed up to drop her son off for a sleepover. Unfortunately for me though.....when I asked her "Does this look leany to you?" she said, "Yes."


So I spent the rest of my night LOOKING at the tower.....over and over and over and over. I was so paranoid about the cake leaning into breakage that the side I thought was leaning I put a towel under the cake swirling thing to make sure it started leaning straight - because things can lean back to straight right? In my head at least........hey no one ever said I was a GREAT Architecture student (but I was - right Mr. Jackson?).


While waiting for my tower to fall over I went back to the valley. Put a nice layer of fondant over the top......pretty right? Then started to fill in the river........My five year old started to see it.


Add in a few boulders around the river - some grass - a few pine trees........a lizard - rather I believe he is a chameleon.
Then a few flowers scattered all about............. After that I called it a night. Tried not to think about the tower that I had propped to lean straight in the china hutch and played with the kids.


The next day we took the entire collection of cake pieces - and two cookies - to the party.


These are views of the car ride to the Birthday Girls house. I thought that the view from this angle was kinda cool. What I did was place the tower on the cake and then pushed the remaining portion of the dowel rods into the base cake. There was also a cake board at the bottom of the tower that had hole punches matching the top of the tower - so there was a foundation at the top and bottom that kept the dowel rods from shifting much.


Although in my head the whole thing was about to fall at any moment. Poor Dave driving the van........

Once we got to the party I put the roof on the tower - placed the figures they had given me to use on the cake........and all was right with the world.


The cookies were Shortbread........I was trying to think of a way to get the Birthday Girls name and message onto the cake and also incorporate the crown that Finn had stolen and was a pivotal point for the characters. Plus everyone loves a cookie right?

So in the end Dave was right (please don't tell him I typed that). The tower was fine. I worried for nothing. But hey, I'm a mother - I worry.


This cake was Chocolate with Vanilla Buttercream and White with Vanilla Buttercream.......Vanilla Fondant and Shortbread cookies with Royal Icing. The pictures of the final cake could have been better, but honestly - I was so crazy nervous putting it together I am just happy I remembered to TAKE a picture!

Wednesday, April 13, 2011

Chilly Birthday

This is another birthday treat that made it onto Facebook, but never made it to the lime light here on the blog.......oops. This is an example of the Gum Paste. Can you tell any difference? Gum Paste vs Fondant doesn't really look much different when finished. However, the gum paste dries much quicker. Well fondant dries quickly too........let me explain better. When I am using fondant to make figures it tends to stay soft longer when I am doing the actual moulding. So it is hard to get a specific shape - most frustrating a ROUND shape. Because one side will want to start to rest and become the kinda flat side. Which isn't a big problem for something like a cake because you want it to have a somewhat flatter side so that it won't roll off the cake or require so much icing to make it stay in place that it shows a lot. Gum paste will set up (dry) a little faster. So the resting doesn't cause the figure to fall out of the shape I want. Does that make sense?
Also - gum paste is a little more forgiving then fondant when it comes to creating figures. If I mess up a figure with either modeling medium I have to wad it up and start over. Sugar dries - as we mentioned before - and it is useful sometimes to have powder (in the form of powdered sugar or corn starch) on the mat I am creating on so that the figures don't stick - if they do stick then I have to tug on them to pick them up and they easily stretch out of shape (imagine playdoh). After wading up a piece of fondant that has been touching a powder you are also adding in the powder that is attached - thus causing the fondant to dry out a bit more. You can counter this by adding a little smidge of shortening or butter (very little), but still you are altering the original texture.


Gum paste doesn't seem to stick to the mat as much - so I can create more without using a powder substance to keep it from sticking. Thus when I mess a form up..........and let's just say that happens with every new thing I create....because the cake pops have now proven I am not perfect every time. With the gum paste I can wad it up - use it - wad it - use it. Not forever of course - but for a little longer then the fondant.

One additional pro for gumpaste over fondant for making figures - you can roll it out MUCH thinner!! Fondant will tend to tear if you roll it out too thin - or crack - or break after it has dried a bit and you try to move it. Gum paste has more elasticity to it. This stretchability (my word - yes you can copy it) helps when you are making roses, flowers, or other things that you mess with to give edges shape. Gum paste also costs a bit less to make - but oddly if you buy it at the store it costs more to buy. Weird huh?

Now in covering a cake - I would go fondant. It is softer in my opinion and easier to place over the cake. Tastes a bit more like icing. I know there are lots of folks who say.....ick fondant tastes awful. Well most likely the person who made your cake did it with store bought fondant. I am always amazed that people doing cakes don't just make their own fondant. Easy to make - and you can flavor it. I make 5lbs for half the cost you buy it at a store. Yes I know - convenience.......that is a whole other blog.


There are tons more Fondant vs Gumpaste issues in my head - but I can stumble into them later. Personally I was resistant to gumpaste - for no reason other then I was getting good at fondant and not wanting to add another trick to my bag. Now I am seeing that there are definite pro's and con's on both sides.


Penguin cupcakes were a hoot to make. And they were fun because it taught me I am getting better at moulding things. They went to one of our Boy Scout families. The Birthday Boy had recently done a project on penguins and he is currently in love with them. Fun!! Learning and Cakes combined with Birthday - LOVE IT!


These were Chocolate & White cake cupcakes with a Vanilla Buttercream icing.

Saturday, April 9, 2011

Pine Wood Derby Cake

Time slips away so dang quickly!! This cake was from February when our Boy Scout Troop had their Pinewood.......or was it January? Dang I think it was actually January. Huh! I was sorting through the "draft" blogs I have hidden away behind this wall of posts and found that I have stashed quite a few cake blogs to sit and wait. While I did post this one on Facebook, I didn't really detail the process of it. And honey, this one really made me frustrated for a few minutes. This cake is made up of 4 1/2 sheet cakes. The base is the length of 1 and a half cakes - then the remaining cakes are stacked up. I let them sit for awhile and then I trimmed them into a slope. This is the closest semblance to a Pinewood track I was willing to try. I mean the tracks themselves are individual strips of pine (surprised it was pine?) and to replicate it exactly would have taken pvc pipes, maybe a little welding and certainly more cake. Dave might have gotten excited ........... but he was last minute finishing cars.........and then friends showed up to have him help them............so I was able to use him as an excuse in my head - I mean without welding......right? Really I don't think we have welding tools, but Dave sure has collected his share, the neighbors share and the population of a small countries share of wood working tools (and he wants more) - so I KNOW he could build a base for a Pinewood cake. Maybe next year? So how this cake was built.....kinda got distracted. Here is a tip - don't use as much powder as I had been at this point in fondant work. See on the previous pic and this one how much white on the blue you see? That is either powdered sugar or cornstarch. BOTH are recommended in many cake sites to be used as you roll your fondant out to be placed on a cake. True it is helpful. However, I think the pics of cake people that I was reading were not really using it right - and the more I learn the more I find that using a lot of powder on your fondant can cause your fondant to dry out (my problem), be cracky (or elephant skin as some refer to it) and various other problems. There are products on the market that can help you roll your fondant out - like TheMat or the Wilton Roll & Cut Mat (I now have both and use them for different things) - which will eliminate your need for the powder - keep your fondant from being dried as you use it - and honestly make it a GREAT deal easier to lay on your cake. Was I using those products here? NO. Was there cursing? YES. Were children banned from the kitchen. YES. Did the visiting pinewood derby car fixing kids understand the ban? NO. Did I get cranky? YES. Did it all work out in the end? YES. One thing that I will NEVER have in my kitchen is the space to roll out a GIANT piece of fondant. Well I guess Never Say Never.........so what I mean is One thing that I do NOT have CURRENTLY in my kitchen is the space to roll out a GIANT piece of fondant. So I cut and paste - which is totally acceptable. I just need to learn to paste better........and I am. I am also learning to hide my pasting spots. One of my favorite things to make on this cake - the checker board bottom. Not sure why, but that was fun. Kinda like a puzzle. Maybe I liked it because it followed the portion of the cake that involved cursing..........and it was easy........so it made me feel better about myself. Then after the checker board I placed lane dividers and painted the track to look as close as possible to pine. Eh........but your brain knows what you are supposed to be seeing and it helps my final goal. Please thank all your brains for tricking you that way for me. Note to self - paint lanes FIRST - then lay checker board........for obvious reasons. Finally the FUN part came. The CARS!! These I made early in the week so that they would dry. It surprised me that they were still a little playdohy (my word - don't look it up). They were dry enough that it did not effect anything though. Placing dowel rods in their base (or I think they were toothpicks since the cars were small - on in the front and one in the back) I popped the cars on. Being careful not to make anyone win - see I made the cars in shades of the different levels of Boy Scouts.........excpet the Green should be more of a Teal color. Tiger Cub - Gold...........Wolf - Red..........Bear - Teal..........Webelo - Blue Did you know that? Learn something new everyday right? The cars were fun to make and pretty simple. It is like going back to school and working with clay.......or even further back and working with playdoh that you can eat. Only it really is PURE sugar and like eating cotton candy - so I pass. Here is another tip I am learning though. Fondant is fun to work with, but with figures like this Gum Paste is a little better. GP will dry faster - not while you are working it, but once you set it to dry before using........much better. Plus GP is a little less finicky and a bit more forgiving - AND cheaper to make. If anyone wants my recipes for either let me know and I will post them. I am told that the fondant is yummy as I flavor mine with both Vanilla & Butter flavorings to try to come close to a buttercream icing flavor. I use the word "close"........ Since we had no real clue as to how many folks would show up.......I threw in some cupcakes. 150 were gauged for the event - the cake was enough for 150 easy, but just to be safe - and since there was extra batter - why not right? Made a few "wheels" to deco these with the extra black fondant I had from another cake I was doing. My friends, Scott & Sheri, who were overseeing the event was thinking Dinner First.........then we will Serve Cake. The folks attending were thinking "Grab a cupcake before they are gone" and did just that. Which frustrated my friend, but secretly made me smile. Before all the cupcakes were gone though - my good friend, Julie, who has her own photography studio......shameless plus.........Capturing Sweet Memories.......she is WONDERFUL!!, took a few photos of the whole dealio. She takes such nice pictures!

When we were carrying the cake in the board bent a little - There is another tip......use heavy duty boards if you have a ton of cake weight! - and the fondant cracked a bit. Julie used her photo magic to fix the cake!!


This cake was Chocolate Chocolate Chip cake, Banana cake and White cake. Vanilla Buttercream and Vanilla Fondant. This ENTIRE cake was totally gone by the end of the night!!

Saturday, February 19, 2011

Slumber Party!!


This cake was a lot of fun to make. And when something looks "easy" I always underestimate the time it takes to do it the first time........because I haven't thought up all the ways to make the cute stuff it would include. Now if I do this cake a SECOND time (and I hope to) - I will know what I am planning to do ahead of time and it will go more quickly.

When Stacey first talked about her daughters slumber party cake we thought we were going to recreate the iCarly laptop cake I did for my friend Julie. However, Stacey is now like me and she will google the theme of what she is thinking. This time it was .......... slumber party cake pictures........and when she did it this she got hits on some super cute cakes and asked if I could do them.

I started with a plain old white iced cake. This cake had no real need for fondant sides because the perfectionistic smoothness was not going to matter anyway.

However, a super bright and cute base would be important and Stacey said Gabby really liked the bright pink colors. Done. Usually I wait to put the base trim on just because I can be messy with my hands and hit the icing and make myself crazy because I dent it. No one wants a cake that looks like their kids stuck their fingers in the icing.......but I figured I was safe - and honestly the bright pink inspired my mood. Weird?


Next up were the slumber party attendees. I knew there were 7. I also knew from the millions of slumber parties we have had at our house now that if you do something that represents a "figures" on a cake it is helpful to try to represent them for each attendee if possible. 50 Boy Scout pinewood derby cars I can't make - 7 slumber party goers I can. So I did.

I rounded some heads and made some hair to pop on. I didn't worry too much about matching up colors for hair to the girls slumbering - the base was bright pink so things on the cake needed to be bright too - having red heads, flaming orange heads, blonds, and brunettes just made sense.


The hair was a challenge at first. The original cake I was referring to for the idea has beautifully cute hair. My first attempts to make hair looked more like a Max Headroom skull cap. Remember Max Headroom? He creeped me out. Or the bad guy from one of my favorite kid shows - Lazy Town - what was his name? Well anyway - what I mean is that my hair totally stunk. How did they get the really cute hair? It reminded me of what kids make with a playdoh press.......the playdoh press we owned was currently under 2 feet of snow in our backyard playset so that wouldn't work.........but I did have a garlic press.........so I cleaned it and tried and guess what!!

It totally worked!! I was so thrilled that it worked I immediately stuck the hair onto the head so that it didn't fall apart. Of course then I noticed they were all starting to have short hair. So I tried making longer hair......and guess what!! It totally worked!!

Sometimes I make myself kinda dance in place and giggle and high five myself. And that is just what I did - which drew the attention of my 5 year old in the other room........who came in to investigate and when I explained just how brilliant I was with making hair he said, "Maudy I do that with my playdoh".........sigh......but then my 11 year old came in and said, "Oh My Gosh Mom that is so GREAT!" and meant it and I went back to kinda dancing in place and giggling and I high fived her.


Then things kinda got to going faster. I put the heads on the cake and made some bodies. At first I was thinking the bodies would be more realistic - then I thought how I was just going to cover them up with blankets so why bother?


At this point I just needed to make the cake fun looking. The only real challenge was figuring out a way to decorate 7 sleeping bags to look individual with the same 3 colors. That is what all those tiny cookie cutters I have been collecting my entire life comes in handy for.


I popped on a few flowers in matching colors of the border to make the white sides a little less empty........wrote a cute message on the bottom to the Birthday girl because there was no room on the actual cake........made a few juice boxes and added some popcorn all over the cake - some slippers tossed in and Tah Dah!!


My understanding is the cake was a hit. Each of the party attendees picked out who they were on the cake and Stacey was so sweet to "wrap up" their girl to take home as a party favor. Smart move because those things are pure sugar and eating all that would have kept them awake for hours!!

This cake was Chocolate Chocolate Chip with a Vanilla Buttercream icing and Vanilla fondant for decorations. So Fun!!