Showing posts with label child's cake. Show all posts

Thursday, October 13, 2011

It's a Pirate's Life For Me


So this cake was FOREVER ago.......as are almost all the cakes I do when finally posted. The summer was really crazy this year. Not so much more then any other, but this summer was the last "free" summer my baby had and I think I was a mixture of "we have to make it fun" and "what the snufflupagus am I going to do with my life once they are all in school?"

Since I was thinking about myself and trying to entertain the troops - I just let this blog slide on by. Now here I am - almost 8 weeks into school - finally getting out of my pity party funk and trying to do a little catch up.

Like a Pirate ship - Let's set sail.......

Come on now - you HAD to expect something dorky like that - it is ME here!!

This cake was for my good friends son, Kai. He was all piratey about things this year. I did a little search on line and found that there are TONS of pirate cakes and variations of pirates themselves. Kai was pretty open ended so we did a nice cake that he could use for a party at his house with his parents and adult friends..........then his mom complimented the cake with cupcakes that looked like pirates for his actual birthday party.

The cake is all done in buttercream for the outside planking. I just iced it and then took a straight edge and traced in the lines to represent wood planks.

All of the "extra" pieces are done in fondant - though when I did this a second time I did the extras in gumpaste so that they would dry faster.


And while these are NOT edible - I was kinda tickled by my creativeness and my execution on these sails. Totally cute right? I used some stamping paper (because it is thicker) and then some wood skewers for Kabobs. I inked the skewers a brown to match the ship - then inked the edges of the paper to give the sails a more fabric look and fraying weathered texture. So cute!


The water is a mixture. I rolled out blue fondant, but then piped on blue buttercream in a swirl type fashion to make it look like the ship were hitting breakers in the waves.


This cake was all Chocolate Chocolate Chip with a Vanilla buttercream that was tinted brown (so it is not chocolate icing). The fondant was all Vanilla flavored.


It turned out so cute that when I showed a pic to a mom on our summer swim team she asked me to do one for her pirate. I will post that soon just for comparison sake!

Monday, July 11, 2011

Sponge Bob Revisited

Remember the tractor cake? If so then you probably remember the picture you see here. Tractor wheels was the point to this picture.........but at the end of the tractor wheels there was left over RKT (rice krispy treats). My kids eat a lot of sweet treats if I leave them laying about. To try to keep that from happening I toss a lot of the scrap stuff into the trash. But I will be honest - that is SOOOOO hard to do sometimes because we are always taught not to be wasteful. On this particular day I also had a Sponge Bob cake to do - so I decided to use some of the extra RKT to fashion the arms and legs. Let them dry for a day with the tractor wheels and voila.....

This is technically my 3rd Sponge Bob cake. The very first was years and years ago for my almost 10 years old sons 3rd birthday. This cake is the 2nd Sponge Bob made with a fondant cover. I am just about ready to do Sponge Bob without looking at a picture anymore. ;o)

Still - no matter how many times you do the same thing - there is always something new and different you can bring into the mix. For this cake it was obviously the arms and legs made from RKT. I heard that the Birthday Boy LOVED the cake. We are on swim team with them and he came up to me the other day (this is months after the birthday) and said, "I am planning my birthday cake". Always fun to hear!!


This cake was Chocolate (if I am remembering right - geez o I should not wait so long to post things!) - Vanilla Buttercream icing and a Vanilla Fondant. Most of all it was loved and enjoyed!


Monday, June 6, 2011

More Girl Scouts!

Here is a Girl Scout Bridging cake that was used for MY Girl Scout troop this year. I love LOVE love my Girl Scouts. When Andersen joined GS's in 3rd grade I went to the registration meeting with her. My goal was NOT to sign up as the leader. I had heard ahead of time that there already was a leader so I figured I was good and there wasn't any big need to scan the room ahead of time and figure out what things were big enough to hide under if they asked for volunteers. We all know I have a Volunteer problem.......although we were just moved into a new town and no one knew us and before leaving I had promised myself that I would enter a 12 Step Volunteer Program.

There we are filling out paperwork - almost to the end of the meeting and the GS Council coordinator says, "Well the troop leader that has this group has decided she only wants to lead 4th & 5th grade. So in order for this troop to happen we will need parents to lead this group". Immediately I started an inner mantra of "I WILL NOT VOLUNTEER. I WILL NOT VOLUNTEER. I WILL NOT VOLUNTEER." And it worked - some other woman said she would lead it.........only.......I had been listening to that woman through the meeting and knew she was NOT a parent I would want leading my daughter anywhere. She was pretty much Miss Inappropriate Universe winner for the area. I won't even waste time writing out some of the things she talked about - just know they were no empowering to little girls in anyway. Then the GS Council person said "Great"........then I raised my hand and said I would "co" to keep things empowered for young girls. Fortunately the leader was not only not appropriate - she also wasn't committed or reliable. By the time the meeting ended she had quit as leader (no I didn't do anything) - but that also meant that I was the leader. I did have a "co" though - she was coming from the older girls troop with her 3rd grader. I figured "how hard can GS's be?"

Little did I know that my "co" leader would become a great friend and I would end up leading a 3 level Girl Scout troop and coordinating our school and becoming friends with many of the parents in the troop - taking girls on trips out of town - camping - scraping outdoor potties and then painting them - selling 1,000's of boxes of cookies with my daughter - watching her earn awards - becoming close with the woman in the Council office - taking on being the Service Project coordinator for the entire council area - and really really loving it!!!

This year was our 3rd Bridging Ceremony. The first year we had 3rd grade and the other troop which covered 4th & 5th. Maybe we had 50/60 people attending. It was modest, but it was fun.

The next year we added the 1st grade Daisies troop. We bumped the number up a bit and also added in the girls entertaining the group with songs and doing the Flag Ceremony.

This year our Bridging Ceremony spanned all grade - K Daisies, 1st Grd Daisies, 2nd Grd Brownies, 3rd Grd Brownies, 4th Grd Jr., 5th Grd Jr. & 6th Grd. Cadettes. It was awesome!! We had the room filled and we actually ran out of cake!! I love that my daughter is part of a community of girls that work hard for the community and accept one another for who they are - goof balls to the end really!! I also love that I can walk through the halls at school and say, "There goes one of my GS's" and on occassion have them call my name and run up and hug me.........Girl Scouts are awesome!!

This cake was half Chocolate and half White - Vanilla Buttercream icing with all deco's in Vanilla Buttercream. Fun to make - Fun to serve!

Friday, May 20, 2011

Phineas

Okay here is another cake I have been sitting on for awhile. I posted the finished cake on my facebook blog link, but never did get it up here. This cake was fun. Michelle - the person who asked me to do it - found the base idea of the cake in a seach, but she wanted it tweaked a bit to include 2 themes - Phineas & Ferb at the beach & Dr. Doofensmirtz and Perry on another layer. But most of all we both wanted to see the "Logo" for the show on the cake........so I started by staring at it and thinking "how will I ever copy that to look authentic". After I did that for a few minutes I made fondant and began the process.

Being kinda caught up in what I was doing I forgot to take pictures (sound familiar). Honestly though my camera has more sugar on it then the cereal my kids are eating these days - so it might be better that I don't take pics during the process - for the life of my camera!

To create the logo I used an Egg Shaped cookie cutter and a tiny Oval shaped cookie cutter. Then matched the fondant up. I also printed the logo out 2 times. One was for referencing as I put things together and the other was to size that I wanted to make the logo for tracing the words Phineas & Ferb.
So basically - I cut 2 layers of the background orange. I placed the sucker pop sticks that I use for Cake Pops in the center of the 2 layers and adhered them to one another with Caro syrup. Then I placed the yellow layer and the small red dot in the middle on top and let it sit for a bit. (I am only NOW noticing that I forgot to pipe "and" in the red dot).

While that was drying a bit I rolled some gumpaste out really thin and let it set up (dry) a bit. This doesn't take long - maybe 5 or 10 minutes. Long enough to read a short book to a 5 year old who will hardly make it to the end of the book. Then I began cutting the letters out. Layed them over the top of the fondant and cut them out with a very sharp knife - or exacto knife. Once these were done I layed those on top of the logo to complete it. Phineas's hair didn't want to stay up and since it sits on the edge I decided that while it was drying for the next few days it would have a support - so I tucked some papertowel underneath it.

Then a few days later I began to assemble the cake. The top layer was Phineas and Ferb at the beach surfing. This is very close to a copy of the original cake Michelle brought to me.


The bottom layer though is different. In the version she and I decided I would create we did a lab for Dr. D and Agent Perry to be in. I asked my 9 year old what things a kid would expect to see in Dr. D's lab..........he said he had no clue. What??? He watched Phineas and Ferb for 2 hour stretches - kids. In fact he informed me that he really wasn't that "into" P&F anymore. Which I guess meant he was sleep watching all those episodes the day before. Kids.


Michelle and I agreed there would need to be a computer screen that said the birthday boys name.........

After that I figured there would need to be a Ray Gun and a few computers. It was fun looking at images of Dr. D's lab and then trying to bring them onto the cake with fondant.


One image I saw over and over was the lab - or some kind of a dome shape that looked like maybe it was a view from outside the lab? I wasn't sure, but I thought it looked fun to copy so I did. Later Ben came in when the cake was done and looked at it. His eyes lit up and he said it was totally cool. He walked around the cake and pointed out various things I had put in the lab and named them off - so I did copy the lab in a way that kids would recognize things - yea!!


And since this cake - Ben has found a renewed love for Phineas and Ferb. He has been watching it a lot lately. Sweet because I kinda like the catchy songs they sing.


This cake was chocolate on the bottom with a Oreo cookie buttercream center - and white on the top with a vanilla buttercream. All topped with a vanilla fondant. Yum!


Monday, April 18, 2011

I think I have this now.......Progression Series


Okay I am pretty certain that at this point I have the BASICS of cake balling down. A week ago I have the cutest cake to do for a family that loves a football team. So I needed to carve the cake........and my new - well I was going to say "motto" is never throw cake away, but that would be totally a lie because just yesterday I threw a ton of cake away because I didn't have time to make cake balls. Given that and not wanting to make myself look thriftier with cake then I am......I will simply say that it is my new "goal" to try to use every bit of cake. In this particular instance I was totally able to.

Also to become a better cake baller (this is what you should call your friends that do cake balls by the way. for no particular reason. just because it sounds sporty. totally expect them to look at you weird though. then laugh to yourself - in your head so they don't think you are certifiable.) - anyway - also.....to become better at cake ball making - I have been using different types of chocolate. Michael's had a sale going this week where there melt chocolates were a good deal - and on top of that I had a 25% off your entire sale coupon - BONUS (gotta love Michaels coupons!) - so I tried those. They melted like cotton candy in humidity (this really happened to some cupcakes I made - ugh cotton candy melts in humidity - who knew? - yeah I know EVERYONE knows - my 3rd grader told me all about it).

Anyway - the cake balls above are the ones that I made to see how the candy would coat. Pretty nicely. Fairly easily. I just need to figure out how to get the cake ball off the spoon without making a mess. Still .... they look like cute little chocolates.


The bulk of the cake mixture went to making these.....footballs. Remember - the cake ball mixture came from a carved cake that was for a football cake. I figured what better way to use the finished cake balls then give them to the family having the party. I asked if they would let me do this - wanted to make sure because you never know when you will show up with something to a party and find out "Dang Patti wish you would have asked - WE HATE CAKE BALLS!!" Silly sounding? Maybe, but you never know when a persons Great Aunt Milly choaked on a cake ball and caused an accident while driving that ran over another persons prized personally genetically developed apricot colored roses that were going to fair for competition and Great Aunt Milly ruined them due to cake ball chokage - was sued by the guy with the roses and won and poor Milly ended up working at Walmart in her retirement because she lost everything in the law suit. You Just Never Know......so I called ahead and asked permission.

They granted it. So I decided to make Cake POPS!! What is the difference between a Cake Ball and a Cake Pop? Duh - the stick!!

Notice that the stick is a REAL BONAFIDE stick this time? Not a cut off straw? I learned - sticks can hold the weight!! Who knew? Yeah yeah my 3rd grader. "Whatev's" as my 6th grader would say.


Basically what I did was roll the cake mixture out onto the counter and cut them with an oval shaped cookie cutter. Simple simple simple. If you do this - roll the mixture out thick. The first couple I did them normal size for a cookie, but you have to stick a stick in them and this makes the mixture less sturdy On The Stick. Of course after cutting the mixture into ovals I then stuck a stick in them and kinda compressed them a bit to make sure there wasn't a lot of air around the stick area.

Following that I dipped them into the melted chocolate. This is a step I still need to perfect. I used an icing spatula spreader thing (they might be called something different at your store if you go looking for them) and gently shaped the chocolate around the football as the excess chocolate dripped back into the bowl - then set them down on a piece of parchment paper to dry. This was pretty quick. Time example - ate dinner - cleaned the table - came back to these and they were ready for the football lines. Since I had some left over black icing from another cake I did that day I used it to make the lines. It seems to me that most footballs have white lines for the strings, but I didn't Google it.


The finaly project I let dry overnight. Some of the footballs fell off their sticks because I - a) rolled the first batch out too thin and they didn't stay attached to their sticks and the chocolate added caused too much stress and they broke off - and - b) I am sometimes clumsy.

In the morning I popped the Cake Pops into bags and tied green ribbons on them. As my sister-in-law and I have learned.......many sites that ship cookies & cake balls advertise that they do this for YOUR display purpose and for Added Freshness. I personally think it is so they don't melt together. Regardless they made really cute little party favors.

The balls in the top picture went to the neighbors after dinner the night I made them. Feedback on them were they were delish!!

These were Deep Chocolate Cake with Vanilla buttercream and Chocolate Mlets on the outside. They really were yummy.

Saturday, April 9, 2011

Pine Wood Derby Cake

Time slips away so dang quickly!! This cake was from February when our Boy Scout Troop had their Pinewood.......or was it January? Dang I think it was actually January. Huh! I was sorting through the "draft" blogs I have hidden away behind this wall of posts and found that I have stashed quite a few cake blogs to sit and wait. While I did post this one on Facebook, I didn't really detail the process of it. And honey, this one really made me frustrated for a few minutes. This cake is made up of 4 1/2 sheet cakes. The base is the length of 1 and a half cakes - then the remaining cakes are stacked up. I let them sit for awhile and then I trimmed them into a slope. This is the closest semblance to a Pinewood track I was willing to try. I mean the tracks themselves are individual strips of pine (surprised it was pine?) and to replicate it exactly would have taken pvc pipes, maybe a little welding and certainly more cake. Dave might have gotten excited ........... but he was last minute finishing cars.........and then friends showed up to have him help them............so I was able to use him as an excuse in my head - I mean without welding......right? Really I don't think we have welding tools, but Dave sure has collected his share, the neighbors share and the population of a small countries share of wood working tools (and he wants more) - so I KNOW he could build a base for a Pinewood cake. Maybe next year? So how this cake was built.....kinda got distracted. Here is a tip - don't use as much powder as I had been at this point in fondant work. See on the previous pic and this one how much white on the blue you see? That is either powdered sugar or cornstarch. BOTH are recommended in many cake sites to be used as you roll your fondant out to be placed on a cake. True it is helpful. However, I think the pics of cake people that I was reading were not really using it right - and the more I learn the more I find that using a lot of powder on your fondant can cause your fondant to dry out (my problem), be cracky (or elephant skin as some refer to it) and various other problems. There are products on the market that can help you roll your fondant out - like TheMat or the Wilton Roll & Cut Mat (I now have both and use them for different things) - which will eliminate your need for the powder - keep your fondant from being dried as you use it - and honestly make it a GREAT deal easier to lay on your cake. Was I using those products here? NO. Was there cursing? YES. Were children banned from the kitchen. YES. Did the visiting pinewood derby car fixing kids understand the ban? NO. Did I get cranky? YES. Did it all work out in the end? YES. One thing that I will NEVER have in my kitchen is the space to roll out a GIANT piece of fondant. Well I guess Never Say Never.........so what I mean is One thing that I do NOT have CURRENTLY in my kitchen is the space to roll out a GIANT piece of fondant. So I cut and paste - which is totally acceptable. I just need to learn to paste better........and I am. I am also learning to hide my pasting spots. One of my favorite things to make on this cake - the checker board bottom. Not sure why, but that was fun. Kinda like a puzzle. Maybe I liked it because it followed the portion of the cake that involved cursing..........and it was easy........so it made me feel better about myself. Then after the checker board I placed lane dividers and painted the track to look as close as possible to pine. Eh........but your brain knows what you are supposed to be seeing and it helps my final goal. Please thank all your brains for tricking you that way for me. Note to self - paint lanes FIRST - then lay checker board........for obvious reasons. Finally the FUN part came. The CARS!! These I made early in the week so that they would dry. It surprised me that they were still a little playdohy (my word - don't look it up). They were dry enough that it did not effect anything though. Placing dowel rods in their base (or I think they were toothpicks since the cars were small - on in the front and one in the back) I popped the cars on. Being careful not to make anyone win - see I made the cars in shades of the different levels of Boy Scouts.........excpet the Green should be more of a Teal color. Tiger Cub - Gold...........Wolf - Red..........Bear - Teal..........Webelo - Blue Did you know that? Learn something new everyday right? The cars were fun to make and pretty simple. It is like going back to school and working with clay.......or even further back and working with playdoh that you can eat. Only it really is PURE sugar and like eating cotton candy - so I pass. Here is another tip I am learning though. Fondant is fun to work with, but with figures like this Gum Paste is a little better. GP will dry faster - not while you are working it, but once you set it to dry before using........much better. Plus GP is a little less finicky and a bit more forgiving - AND cheaper to make. If anyone wants my recipes for either let me know and I will post them. I am told that the fondant is yummy as I flavor mine with both Vanilla & Butter flavorings to try to come close to a buttercream icing flavor. I use the word "close"........ Since we had no real clue as to how many folks would show up.......I threw in some cupcakes. 150 were gauged for the event - the cake was enough for 150 easy, but just to be safe - and since there was extra batter - why not right? Made a few "wheels" to deco these with the extra black fondant I had from another cake I was doing. My friends, Scott & Sheri, who were overseeing the event was thinking Dinner First.........then we will Serve Cake. The folks attending were thinking "Grab a cupcake before they are gone" and did just that. Which frustrated my friend, but secretly made me smile. Before all the cupcakes were gone though - my good friend, Julie, who has her own photography studio......shameless plus.........Capturing Sweet Memories.......she is WONDERFUL!!, took a few photos of the whole dealio. She takes such nice pictures!

When we were carrying the cake in the board bent a little - There is another tip......use heavy duty boards if you have a ton of cake weight! - and the fondant cracked a bit. Julie used her photo magic to fix the cake!!


This cake was Chocolate Chocolate Chip cake, Banana cake and White cake. Vanilla Buttercream and Vanilla Fondant. This ENTIRE cake was totally gone by the end of the night!!

Wednesday, March 23, 2011

Who Lives In A Pineapple?

So I think this is a cake that went up on the Facebook Ipsy a few weeks ago. I am not a hundred percent sure, but I am fairly certain of my memory skills at the moment without looking. Years and Years ago I did a Sponge Bob for my precious Ben. And although isn't cool to call a boy of age 9 precious......he is still precious. The one I did for Ben was all buttercream though. If I were not on vacation I could find that picture and then upload it for comparison, but since it was about the 4th cake I ever did I can honestly say - this one is much cleaner - but it is always fun to look back and see where you come from. This one was really fun and since fondant RARELY makes me cry these days - notice please that I said "rarely"......because we are not out of the experience woods of tears due to fondant quite yet. Granted it is more "cursing" then "crying" ...... or I will do this thing where I call out to see who is on the first floor with me - because from the angle I do fondant I can't see who is in the dining room, living room or the entry where Dawson likes to play because the floor is nice and slippery - anyway - I will call out and see who is there - then banish them. Yes I did say BANISH. If they initially resist my banishing due to watching television I will more forcefully banish them - still no cursing - and if I still hear the TV going I will do a little Motherly Threatening and ensure them that the banishing is completely for their own safety. Then after they are all gone - if I should accidentally (because I only curse for accidents and to make my friend giggle) - no one that shouldn't gets an earful. Dave knows to stay away because some how ALL fondant problems are his fault - we have been married for almost 15 years - he is a smart man.

Anyway - enough about the past and banishing. Spongebob was fun! I covered him in buttercream and then topped him with fondant. I am learning that any big "extra" pieces - like the arms or legs on Spongie here - should be done a few days before - helps them set up and move around to be placed easier. However, I wasn't sure that I should be able to make them correctly sized to scale if I made them ahead of time. So I waited.

For the most part this was not a problem. And while you can't see it - the only difficulty not making the extra pieces ahead of time caused were having the legs attach at the body. The pants wanted to let go of the legs and droop a bit.

Outside of that small problem the only time consuming part was making the different colors and creating the pieces. Which really wasn't a problem at all. Just a time clock thing.

One thing I did find interesting was that when the kids saw the end product they said "Why are there green dots on him?".......so I explained the indention thing and that in many pictures from the cartoon I googled about him they were a green shade and not just a deeper shade of yellow. So they did their own google - and yes they did come up with a few pics that show it a more gold or golden tan - and they made a strong point of making sure I could have gone the gold colro route.........but most of the pics had green spores - so they did concede a bit. That was a fun lesson for them about how you can look at something all the time and may not really see everything it. I could go into in deeper detail about this lesson with them - but since they were just coming to this realization and I was the only thing they were focusing on the conversation really went into how they never noticed these different not so flattering things about me..........but at least they were learning right?

This cake was Chocolate Chocolate Chip. Vanilla Buttercream icing and a Vanilla Fondant. Although I am always surprised how many people think a yellow or brown fondant must be lemon or chocolate.......funny how our brains work right?

Now go look at something for a few minutes and write down all the things you noticed and see if you got them all right.

Wednesday, March 2, 2011

Happy Birthday Dr. Seuss!


Happy Birthday Dr. Seuss!!!

How old would Dr. Seuss be today? Well he was born March 2, 1904 (do the math and you will see 107 he would be).......same year as the St. Louis World's Fair where hot dogs and ice cream cones were born!! Can you tell I am from St. Louis? Course Dr. Seuss wasn't - he was born in Springfield, Massachusetts (where my favorite friend Noel lives). I wonder if they treat Seuss's birthday around that area like they do Abraham Lincoln around here in central Illinois?

A few years back I read a little about him in a bio. He remembered back that as a child his mom would soothe them by sing songing chants about things. That made me feel good because I do that with my kids - maybe they will grow up inspired by my sing song rhyming chants.........."If you don't pick up your shoes you will soon be singing the blues"....."Eat the greens on the plate or you will never go on a date - you'll stay home with us and miss the bus that includes doing anything away from us"......"I've said it once, I've said it twice, Make is say it again and you'll pay a price"........think those will make my kids brilliant children's book writers?

Well Ben did just win the Young Authors award - so there is hope right?


Anyway.......these were fun to make and they will be fun to take to school. I googled Cat In The Hat cupcakes and found this idea. The kids will get a big kick out of them because besides being served yummy icing - they will also get some cotton candy (because we all know that a cupcake is a cupcake after all - the real treat is the icing - cupcake is simply a catalyst to carry icing for kids).

Now - if you are going to copy this cupcake - KNOW THE FOLLOWING - Do Not create the entire cupcake and then wrap the box to keep the moisture of the cupcake in. Okay - go ahead - flick me in the forehead - but YES I DID THIS. Within 2 hours my Thing 1's and 2's hair were totally flat. Sigh.

You Live You Learn You Take Your Turn Doing Things Once and Sometimes Twice - Just Be Sure To Tah Dah at the Finish With Something Nice.

Tah Dah - these cupcakes were something new. Applesauce (oh my goodness YUM! - tastes kinda like apple crisp a bit.) There is a Cream Cheese Marshmallow filling and a Vanilla buttercream icing. VERY Yum!! My neighbor came by and I fed her my sample - she said "YUMMO!!" I ate the filling hole scraps and agreed!

Saturday, February 19, 2011

Slumber Party!!


This cake was a lot of fun to make. And when something looks "easy" I always underestimate the time it takes to do it the first time........because I haven't thought up all the ways to make the cute stuff it would include. Now if I do this cake a SECOND time (and I hope to) - I will know what I am planning to do ahead of time and it will go more quickly.

When Stacey first talked about her daughters slumber party cake we thought we were going to recreate the iCarly laptop cake I did for my friend Julie. However, Stacey is now like me and she will google the theme of what she is thinking. This time it was .......... slumber party cake pictures........and when she did it this she got hits on some super cute cakes and asked if I could do them.

I started with a plain old white iced cake. This cake had no real need for fondant sides because the perfectionistic smoothness was not going to matter anyway.

However, a super bright and cute base would be important and Stacey said Gabby really liked the bright pink colors. Done. Usually I wait to put the base trim on just because I can be messy with my hands and hit the icing and make myself crazy because I dent it. No one wants a cake that looks like their kids stuck their fingers in the icing.......but I figured I was safe - and honestly the bright pink inspired my mood. Weird?


Next up were the slumber party attendees. I knew there were 7. I also knew from the millions of slumber parties we have had at our house now that if you do something that represents a "figures" on a cake it is helpful to try to represent them for each attendee if possible. 50 Boy Scout pinewood derby cars I can't make - 7 slumber party goers I can. So I did.

I rounded some heads and made some hair to pop on. I didn't worry too much about matching up colors for hair to the girls slumbering - the base was bright pink so things on the cake needed to be bright too - having red heads, flaming orange heads, blonds, and brunettes just made sense.


The hair was a challenge at first. The original cake I was referring to for the idea has beautifully cute hair. My first attempts to make hair looked more like a Max Headroom skull cap. Remember Max Headroom? He creeped me out. Or the bad guy from one of my favorite kid shows - Lazy Town - what was his name? Well anyway - what I mean is that my hair totally stunk. How did they get the really cute hair? It reminded me of what kids make with a playdoh press.......the playdoh press we owned was currently under 2 feet of snow in our backyard playset so that wouldn't work.........but I did have a garlic press.........so I cleaned it and tried and guess what!!

It totally worked!! I was so thrilled that it worked I immediately stuck the hair onto the head so that it didn't fall apart. Of course then I noticed they were all starting to have short hair. So I tried making longer hair......and guess what!! It totally worked!!

Sometimes I make myself kinda dance in place and giggle and high five myself. And that is just what I did - which drew the attention of my 5 year old in the other room........who came in to investigate and when I explained just how brilliant I was with making hair he said, "Maudy I do that with my playdoh".........sigh......but then my 11 year old came in and said, "Oh My Gosh Mom that is so GREAT!" and meant it and I went back to kinda dancing in place and giggling and I high fived her.


Then things kinda got to going faster. I put the heads on the cake and made some bodies. At first I was thinking the bodies would be more realistic - then I thought how I was just going to cover them up with blankets so why bother?


At this point I just needed to make the cake fun looking. The only real challenge was figuring out a way to decorate 7 sleeping bags to look individual with the same 3 colors. That is what all those tiny cookie cutters I have been collecting my entire life comes in handy for.


I popped on a few flowers in matching colors of the border to make the white sides a little less empty........wrote a cute message on the bottom to the Birthday girl because there was no room on the actual cake........made a few juice boxes and added some popcorn all over the cake - some slippers tossed in and Tah Dah!!


My understanding is the cake was a hit. Each of the party attendees picked out who they were on the cake and Stacey was so sweet to "wrap up" their girl to take home as a party favor. Smart move because those things are pure sugar and eating all that would have kept them awake for hours!!

This cake was Chocolate Chocolate Chip with a Vanilla Buttercream icing and Vanilla fondant for decorations. So Fun!!

Saturday, January 22, 2011

Magical Gluten Free Vegan Cupcakes.....really

These little gems accompanied Dawson's Bunny Top Hat birthday cake. They are an example of HOW MUCH FUN I am having using the edible markers!! But I didn't make them only because I wanted to use some markers. My friend, Marji, has a son (the youngest of 4) who is allergic to almost everything edible. As he gets older foods are added - but right now at the ripe old age of 4 he goes to Birthday parties and other Celebrations and when they are passing out cake his wonderful mom whips out a Ziploc bag with a treat he can eat.

What would that be? Well it would be a Gluten Free, Egg Free, Milk Free and the list goes on Free baked good. So what is this? Well this is a variation of the cupcake I made for the teacher who was Gluten Free. This is a Gluten Free Vegan Chocolate cupcake. Seriously.

Since Fondant is dairy free - just sugar and water with a little gelatin - he is totally kosher to eat fondant. And since I can use fun edible markers on fondant............I was able to make something cool for Nathan.

At one point in the party he started hugging my leg. I looked down and he said, "Thank you". Not realizing what he was thanking me for I told Marji about it. She said he had just looked at the Magic Hat Cake and said, "I don't get to eat that do I?" and she picked the plate of fun cupcakes up and said, "No, but Patti made all these just for you." and then he ran over to hug me.

Later I asked Marji if he liked them.........and she said, "After he finishes the 3rd one I will ask him." and smiled at me. Mission Accomplished.

These cupcake are as I said earlier - Gluten Free Vegan Chocolate Cupcakes. The flour used was a blend of Rice flour, Potato flour and Tapioca flour. There is no base icing to avoid allergies, but a straight Vanilla Fondant icing is used.

Thursday, January 20, 2011

Magic Hat Cake

This cake was done the same day that I did the Electric Guitar cake AND we were throwing a birthday party for Dawson.............and I might have also been dealing with a sinus infection.........so I am not surprised I forgot that I took any pictures of this cake!! Yet today I ran across them. And I have to say that even though I felt I wasn't giving it my 100% on this due to focus problems - it was really cute.


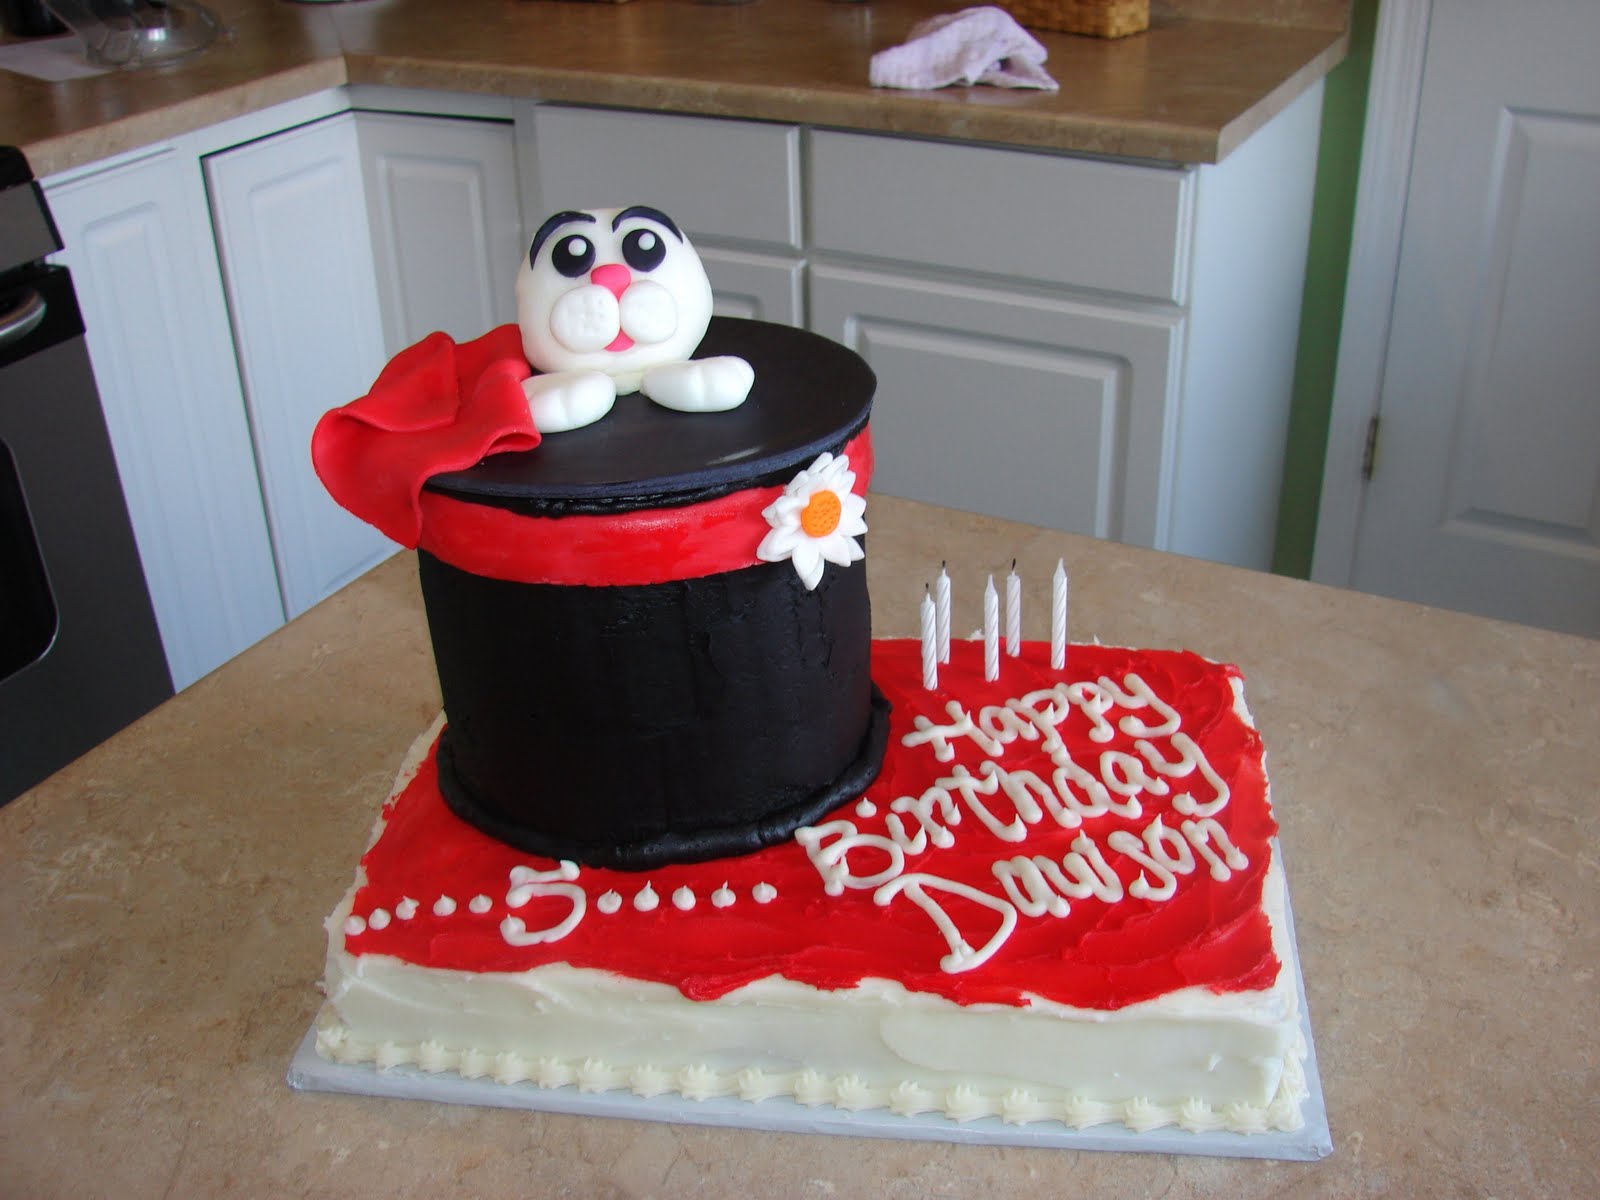
I completely didn't take any "construction" photos until the end - and there were a few flaws on this - although the Bunny was so darn cute I don't think people realized that my Top Hat has NO BRIM!! In original measurements the brim of the hat would sit over 1" of the 8" round cake. Then after adding about 1/2" of icing on either side of the hat the brim disappeared - POOF!! - Like Magic!! Ironic right?


Now I have learned a thing - or twelve - about fondant through the past few months - and I learned that you do not wait until the last minute to make figures that hold weight in them. Like the Bunny - and even like the Daisy. I did all the figures about 4 days prior to the event - and honestly - the head could have used a few more days. Cheeks - Bunny Feet - Nose - all that was good, but the main portion of the head was dry enough that it didn't morph shape when you touched it - however, the center was not dry enough that when I tucked the ears in the weight of the ears pressed the inside dough around a bit.


So we waited until right before the party to pop the ears on. The Magician Scarf was done the day of - just draped some red fondant over the edge to look like a scarf. I believe that it was the scarf and the Daisy that throw the eyes off from noticing there is no brim. The base of the cake was done just super plain so that all the attention goes to the Top Hat.


Once the ears were on the Bunny it was perfect. You might notice that one ear has a bend - that was intentional and dried to do that. The ears still probably could have used another day themselves to dry too though. But they were super sturdy.


The kids LOVED the cake!! And the adults wanted to know what I made the hat out of and seemed genuinely tickled that the hat was also cake and everything was edible........and yes - the Birthday Boy got a Bunny Ear!


This cake was 2 flavors - the Top Hat was Chocolate Chocolate Chip with Vanilla Buttercream (2 layers) - the base cake was Pumpkin Spice cake with Vanilla Buttercream icing. Vanilla Fondant was used for decorating.