Sunday, October 31, 2010

Creepy Crawling Cake

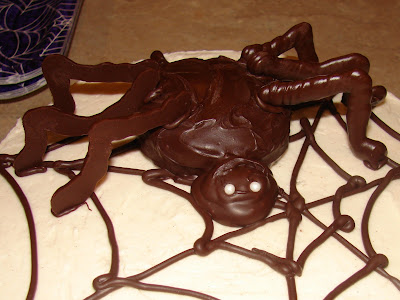
Before I did the Spider Cupcakes I had the pleasure of hosting my Bunco group for a night of fun and feasting. Since it was so close to Halloween and I wanted to test out making spider webs with chocolate I decided to make a Spider Themed cake. I started out by melting Semi Sweet Chocolate Chips and then piping a BIG spider web onto the cake plate.


After that I piped out a few different types of spider webs to see what might look most Spidery - and to get a feel for the flow of the chocolate - I learned a smaller cupcake would benefit from webs piped with a smaller tip - these webs were bigger then I wished simply because a lot of chocolate came out quickly. I also learned that letting the chocolate sit and cool a bit is smart too - makes the flow of the chocolate come out slower.

In addition to making the webs I also made a few Spider Legs..............you will see why.

Sorry - skipped a few pictures - or rather FORGOT to take a few pictures. So I had a two layer cake - iced with Vanilla Buttercream - then I piped the chocolate over the top in a spider web. The body of the spider is a cupcake cut off short and turned upside down - covered in the chocolate. Then I piped some chocolate for a head and let it all sit to set a bit.

After waiting a short time I added on the legs of the spider. I attached them by adding a small amount of chocolate at the body and at the cake. They didn't wobble at all.

Popped on two small candy pearls for the eyes and Voila! a spider was born..........er created.

Then I dropped a few webs down the side and added a couple small spiders I made after taking the earlier picture of the webs......and a few spider webs........and it was done!!

The cake was Pumpkin Spice and the Icing was a Cinnamon Buttercream......yum!!

Friday, October 29, 2010

Spider Cupcakes

Happy Halloween!! Or since this year Halloween seems to be a 3 day event - Happy Halloweekend!! Today is the day for Class parties and parades - usually I sign up for the classroom main treat and bring something fun, but I was beat to the sign up sheet. So while I was wandering the halls one day I heard on the wind that there was a class without parent helpers and I immediately offered up my cupcake baking abilities........and it was agreed - I could provide the main treat - yea!!


So I started with a cupcake - topped it with some Chocolate Buttercream and created small spider webs for each one. The spider webs are made of melted White Chocolate Chips - then piped onto parchment paper in the shape of a web. I just used my imagination. After about 5 of them they started to look more like snowflakes and I freaked a bit - but no, they are spider webs - however a Christmas idea was born...........

After creating a home for a spider I tinted some of the Chocolate Buttercream black - and made a spider for each cake. Easily done - quick - and complimented the "idea" very nicely. Creeped my 4 year old out enough that he thought for a moment they were real..........and then realizing they weren't asked for one!!

This cake was Chocolate Chocolate Chip with a Chocolate Buttercream icing - White Chocolate was used for the spider webs.
Hope you have a Super Fun Halloweekend!!

Wednesday, October 27, 2010

40 Cake

An earlier email alerted you to the fact that Dave turned 40!! Well since it was posted early in the day it didn't also say we had a SURPRISE PARTY for him. And..........he was TOTALLY suprised!!

When we discussed his birthday cake he said "No Fondant".....hmmmm....makes the cake a little less exciting....."very little icing"........hmmm....that makes it hard to decorate anything elaborate.....and he wanted a Chocolate Chocolate Chip cake...........hmmm....that makes it hard to cut things into shapes that we could put just a little icing on - dang he tied my hands up a lot.

Still - we started with a cake shaped like a rectangle.

And eventually made it to a Zero.........half of the number.........

Forty!! We (Andersen and the boys were helping on this one - I spend all my time saying "No you can't help this is for a special occassion that someone has trusted me to help create" that it was nice to say "Daddy would love you to be part of this creation". And so the number 40 was decided upon.

I "Dirty Iced" the cake as Ben likes to say - others know this as "Crumb Coating". I also put the basic layer of icing on as chosen by the kids - Red on one side and White on the other - for the St. Louis Cardinals.
Then the boys disappeared. Honestly it was never a great idea to have given Dawson an icing bag - more would have gone in his mouth then on the cake. Ben seemed to be overwhelmed by the thought of having to come up with his own idea - he is apparently a very good director (everyone has their strengths right?). Andersen stayed to the end though. She did all the decorating.

She did all the lettering and it was she who came up with the ideas for the pictures that represented Dave. She also executed them. There were tears. It was kinda like what I imagine it was like when I first started. Dave calming me down - me getting tense - scraping off icing - frustrated that it was so hard to hold the dang icing bag. All the same things Andersen complaind about.

Yet she did FABULOUS!! The cake was Super Cute!!


She represented Dave's love for the Cardinals - Baseball and playing Softball - a Grill for his master Grilling Skills - a Hammer for his Woodworking - and a Computer for his wonderful IT abilities...........she got him!!
The cake was Chcocolate Chocolate Chip and Banana with a Vanilla Buttercream icing.


Monday, October 25, 2010

Pumpkin Deliciousness


These little cupcakes aren't over the top fun to look at.........but dang they were yummy!!

It is Fall here in the Middle of Illinois - leaves are changing - apples are falling and pumpking are being picked. I picked a few - baked them down - made a puree - and then turned them into Pumpkin Spice Cupcakes........topped them off with a little Cinnamon Buttercream icing and OHMYGOSH!! They were a total treat.

These cupcakes went to a friend that Dave works with, but we DID keep a few home with us for the weekend - although they never saw Sunday!!

Friday, October 22, 2010

Dave's Birthday Cupcakes


It is my Sweetie's Birthday Today!! Happy Birthday Day Dave!!

Today Dave turns all of 40 years old..........Yesterday he wanted to take some cupcakes to work - so we baked up a couple dozen - iced them - and then I took small rounds of fondant and wrote a message of Birthday Wishes (notice I left his age off - that makes me wonder - at what AGE do we start leaving our age off the Birthday Cake? I mean when I do cakes for friends they always ask it to say "Happy 12th Birthday SoandSo"........is it 21?)


Well anyway - I saw that some Cakers have come up with the clever thought of cutting small flat fondant pieces and writing letters on them to create a message that can transfer to cupcakes. How smart was/is that? So here it is - and most likely here you will see it again!!

These Birthday Cakes were Dave's favorite flavor - Chocolate Chocolate Chip - some with a Vanilla Buttercream Icing and some with a Chocolate Buttercream Icing (Dave's fav is the Vanilla).

Happy Birthday All Day Long!

Saturday, October 16, 2010

Diary of a Wimpy Kid's Birthday Cake


The story of the Whimpy Kid cake will start with this...........the only way I have figured out to day as to how to make a cake Half 'n Half. I put a cutting board in the center as a divider and then start to scoop the batter in from either side (one at a time since I only have 2 hands).

When finished it looks like this and I take the cutting board out and scrap the sides of it before putting in the sink.

Have you found an easier way? I would LOVE LOVE LOVE to know it so that I can have 2 hands to put batter in while the divider stays in place.

Once baked and cooled - the Diary cake was crumb coated with a buttercream and set to the side.

Now this cake is the FIRST EVER - Second Cake from the same design I ever made. Yeppers - 11 years of decorating kids cakes for them and I have never had a repeat performance cake. So I was very excited to do this. It meant that I could take from the experience of what "could be tweaked better" after doing the first cake and see if it worked out.

There were a few things that I thought could have looked nicer from the first cake - like the edges of the book. I will show you as we go through it.


Now keep in mind - I was very pleased with the first cake.........this is the first one - the difference in the second is this time around I did the edges of the book a little too long over the top edge - and the cover of the book is not attached to the spine of the book - notice the crack where the side meets the cover? Notice how the edges of the book over the pages is kinda droopy and a tiny bit cracked looking? That I would have liked to be different.


So with Diary Cake II I changed that. The fondant for the cover and the binding side are all one sheet - nice and smooth transition from cover to side. The edges of the cake over the pages are also different - I placed the fondant on the cake - cut the edges off adn then rolled fondant into a long tube and attached it to the edge giving them a more smooth finish. Much cleaner I think.

Cake I you can see that the edges around the book are cracking - and that the pressure of that edge over the side caused it to look a bit more like paper and less like a hardback cover. However - love the way the piece of paper on the front looks.


The edges are cleaner on Book II - but the paper looks a smidge smaller and not as identical to the original book. Still......no one really notices that much.

After those tiny differences there really isn't much to be compared. Both cakes turned out cute and they are so close to the same in the final product that I was happy with either. Hopefully more friends will say, "Oh can you do that cake again for me......." - not that I am banking on that though because most want something completely unique.

The process of drawing the cover with Gret dropping his ice cream cone. The detail on the cover (the brown edging and stuff) are all done with a mixture of water and brown food color that was then painted onto the cake. The blue lines on the paper were the similar - mixture of water and blue food coloring painted on. All the other drawing is done with a buttercream icing colored to match.

The final Cake ............ The birthday girl loved it. Yea!! Another win. Her mom loved it too. Working with fondant that doesn't really have to look perfectly smooth is so much easier then trying to find perfection - but getting to do the same cake twice certainly makes it easier to improve a design. Practice Makes Perfect.......Practice Makes Perfect.......but you can only beg so many people to let you do their cake.
This cake was half Chocolate and half White Silver cake.......with a Vanilla Buttercream icing and a Vanilla Fondant.

Thursday, October 14, 2010

Box of Cupcakes


Everybody loves a Sweet Surprise Present right? This one was for a friend who was having a birthday and I wasn't sure she was getting a cake. Being a single mom with two kids under 12 sometimes means not getting a cake on your actual day - I remember this because I don't remember making my own mom a cake until I was much older.


Since I was whipping up some batter for some other cakes - I thought a few cupcakes was in order for a mom who works hard everyday to make sure her girls are happy.


Nothing better then a little Chocolate Buttercream icing and a Cherry on top right?

Happy Birthday to the Single Moms (and Dads)!!

These were White cake and Chocolate Buttercream Icing.

Tuesday, October 12, 2010

Birds of a Feather - Part III - Celebrating Adoption

After making the nest and the birds - waiting a few days so everything would be nice and fresh......it was time to bake the layers of the cake. I didn't take too many pictures of that. The bottom layer was my favorite - Carrot Cake - the middle was a from scratch Strawberry Cake (I get to learn new things from others choices) - and the top layer was a Coconut Cake (another newbie to me). All done in two cakes to give a little extra height. And yes.........I warned them they would have enough cake to feed all of the community.

Iced........the Carrot got Cream Cheese (of course) - the Strawberry received a Buttercream coating (which I whipped and it made the icing all crunchy.....won't be doing that for decorating under fondant again - makes the fondant bumpy) - the Coconut received a Cream Cheese with some Vanilla & Almond flavoring in them........yummy.

Then came the fondant. Practice Makes Perfect.......Practice Makes Perfect..........Practice Makes Perfect.......Rolling fondant out is super easy (in a building your bodies upper strength kinda way).......but not having the right tools makes the event super challenging because even if you get it all right on the counter - you still have to pick it up and put it on the cake.

The other day I hit this blog site about cakes - a supposed novice like myself doing cakes for fun and documenting them. Her cakes looked FABULOUS and were titled "My first fondant cake" - PERFECT - "My second fondant cake" - MORE PERFECT - "My third fondant cake" - FREAKING AMAZING......in my head - "well if she can do that me too!!"
While it certainly looks like I have that all under control.......this is where photography can create an illusion and where I began to wonder if the person on the Internet claiming to be so fabulous the first go round was telling the truth - because looks can be deceiving......

Flip my cake around and this is what you see..............AHHHH!!!! Sure it rolled out great - in theory all you have to do is roll it onto the rolling pin and you will be golden.........Sure......"My first fondant cake" (not really mine....just channeling the cake site hit).
This is where having children is helpful for me. After crying out loud - like seriously finally breaking down and crying (for about 15 seconds) and having my children stand in shock watching.........I picked myself up - looked them in the eye and said, "There is always a way to make things better." and then something along the lines of, "Never be a quitter."

Then I started to get creative. The other day I also watched a video on YouTube about making fondant bows. While I had never tried to do this before I figured.......it can't get worse right? Did the bow fix the problem? No not really -but it was a good start and I did still have all that beautifully colored fondant left to find a way to decorate the cake with.
Color on a blank pallate can change everything..........and distract the eye. So the night prior to the final fondant I had spent some time making different types of flower and things to place on the cake. Remember the only real design element that was asked for was color - nothing about how to get it into the design - just that it existed in the final product. These colors all matched the Bird Family.

As I began putting the flowers and leaves onto the cake and around the areas of the un-sightly fondant - I began to notice that I no longer really noticed the gaping fondant mistakes that were part of the cake.
I also began to realize why so many fondant cakes have either a real ribbon around the base of the cake - or they have a fondant strip in a color that is made to LOOK like a ribbon at the base of each tier. Things are becoming clearer to me. Those perfect cakes may be more of an illusion - and it may be why so many of the photos are not taken as "up close" as my photos are. Smart bakers.
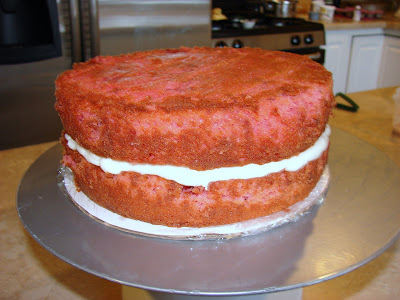
Still all the added color and the bows did take care of the truly tear inducing look of my fondant covering. At this point in the decorating I was feeling like announcing - with happiness - "My first fondant cake - I am AWESOME!"

and there was one side of the cake that DID look close to perfect - it was the BACK SIDE - where I was able to leave just a few flowers so that all the eyes were pulled forward into the camouflaged area.
Personally I quite like the back.

The nest and the cake.......notice the nest is darker now? Yes, as I said earlier - once the cake was covered I noticed that the white fondant and the light tannish color of the original birds nest really kinda washed out compared to the colorful flowers and the colorful bird family. So a quick fix was in order for the families nest. Darker worked much better.


The Final Cake. I was so happy to have this done and looking really really cute. Yea Me!!
Even more so - Yea the Family that has built a Nest so loving that they could add 5 children to is in less then 1 year. Our family is very proud to have them as our friends and we were so happy to be part of their special day.